Internet Certificates and https
Summary
Internet Security is confusing. There is an overwhelming number of new concepts to explore and understand.
The principal benefit of using https when compared to http is that a server that identifies as a particular organization, actually is the organization in question. That is, the server has “been authenticated” by some trusted authority as actually being that which it claims to be. These trusted-authorities issue certificates for servers to distribute to clients on a connection. A client can scrutinize the credentials supplied in the certificate, referring to the trusted-authority, to verify the autheniticity of the server. A pre-requisite for the scrutiny process is that the client also trusts the “trusted-authority”. With this notion in place, then it follows that a client can also trust certificates issued by the same authority.
Where data is requested of a server a digital certificate of authenticity is supplied by the server to a client to authenticate the server to the client as part of a data response.

It must also be assumed from a security standpoint that the notion of server-trust may also be under attack, as an entity that successfully falsifies the certificate system, may also be able to create a false-certificate allowing a malevolent server to masquerade as a legitimate server.
To better understand the process we can simulate the participants in a lab setting and create our own certificates, acting in the trusted-authority role and creating a server that issues our own trusted certificates.
There is a common process to the creation of certificates.
- Create a Private Key
- Note that wherever a key file is used in the creation of a certificate or request, a passphrase may need to be supplied.
- Create a signing request that uses the Private Key
- with 1 exception explained below
- Create a new certificate that incorporates the private key, signing request and other certificates from a parent trusted-authority (if it exists).
- The certificate-chain is used to establish trust via a hierarchical-chain-of-authority.
An implicit step that follows from above is the deployment of the new certificate to a Certificate Store hosted on an operating system.
The Certificate Authority
- A Certificate Authority must self-sign a certificate as there is no other authority to verify against.
- We can define our own Certificate Authority (CA), by creating a certificate that must be deployed to all machines on our network.
- On the broader internet, CA certificates are deployed as part of an operating system or OS upgrade.
- Web browsers maintain their own collection of certificates, also shipped as part of the software and upgraded with each release.
- In an Enterprise an IT Administrator may deploy certificates to managed machines so they can trust known servers hosted within the Enterprise WLAN.
- Some applications may compile certificates into the deployment so that the software can only trust specific servers when making a connection. Such an approach requires careful management of the software build process as and changes in ‘trust’ will also require new software deployments.
Certificate Creation Tooling
- instructions supplied assume the installtion of the
opensslcommand line tool that is commonly supplied with most linux installations. - instructions for creating certificates using PowerShell can be found at learn.microsoft.com
- Either tool can be used following the common process above.
- The default webapi application scaffolded by the dotnet CLI and by Visual Studio is a mock “Weather” application. We’ll create a certificate for this application demonstrating that it uses our new certificate chain.
- For this lab you’ll also need to know how to operate a DNS server within your LAN which can be configured to match new certificates issued during the process.
The Root Certificate
- Create a Private Key for the CA
openssl genpkey -algorithm RSA -out MacRobertRootCA.key -aes256 4096- This step may prompt the user for a passphrase which must be supplied wherever the key file is subsequently used.
- Generate the Root Certificate using the Private Key
openssl req -x509 -new -nodes -key MacRobertRootCA.key -sha256 -days 3650 -out MacRobertRootCA.pem
- Note that there is no signing request for a Root Certificate as there is no Parent Authority to submit a request.
- Verify the Root Certificate
openssl x509 -in MacRobertRootCA.pem -text -noout
The Intermediate Certificate(s)
- Multiple levels of Intermediate Certificates
- Why use an Intermediate Certificate?
- In the event of a certificate security breach, certificates must be re-issued both at intermediate CA level and server certificate level.
- If the Root certificate is breached then the entire certicate tree should be re-issued. This could be a problem where thousands of server certificates have been issued.
- Intermediate CA certificates are issued for the purpose of certifying servers, so that the impact of a breach can be limited.
- Why use an Intermediate Certificate?
- The Intermediate Certificate
- Create a Private Key for the Intermediate CA
- Create a Signing Request
openssl req -new -key MacRobertIntermediateCA.key -out MacRobertIntermediateCA.csr
- Generate the Intermediate Certificate
- Create a configuration file containing extra configurations for the certificate
[intermediate_ca] basicConstraints = critical,CA:TRUE keyUsage = critical,digitalSignature,cRLSign,keyCertSign - Using the Root Certificate, Signing Request and Intermediate Key noting the
intermediate_careference to the section of the configuration file.openssl x509 -req -in MacRobertIntermediateCA.csr -CA MacRobertRootCA.pem -CAkey MacRobertRootCA.key -CAcreateserial -out MacRobertIntermediateCA.pem -days 3650 -sha256 -extfile Intermediate.cnf -extensions intermediate_ca
- Create a configuration file containing extra configurations for the certificate
- Verify the Intermediate Certificate
openssl verify -CAfile MacRobertRootCA.pem MacRobertIntermediateCA.pem
Server Certificate
- Issued by the server on connection as part of the https protocol ‘handshake’.
- Doesn’t matter if the server is behind a firewall, docker or direct. It’s part of the server conversation with the client.
- Create a Private Key for the Server
openssl genrsa -out weather.macrobert.home.key 2048
- Create a Signing Request
- The common name (CN) should match the fully qualified domain name (FQDN) of your server
openssl req -new -key weather.macrobert.home.key -out weather.macrobert.home.csr
- Generate the Server Certificate
- Create a configuration file (
weather.macrobert.home.cnf) containing extra configurations for the certificate
authorityKeyIdentifier=keyid,issuer basicConstraints=CA:FALSE subjectAltName = @alt_names keyUsage = digitalSignature, nonRepudiation, keyEncipherment, dataEncipherment extendedKeyUsage = serverAuth [alt_names] DNS.1 = weather.macrobert.home- Signed by the Intermediate CA
openssl x509 -req -in weather.macrobert.home.csr -CA MacRobertIntermediateCA.pem -CAkey MacRobertIntermediateCA.key -CAcreateserial -out weather.macrobert.home.crt -days 365 -sha256 -extfile weather.macrobert.home.cnf- Important Note how the Server Certificate need only be signed using the private key of the Intermediate CA, but not the Root CA.
- Create a configuration file (
- Verify the Server Certificate
- Note that verification will require the full preceeding certificate chain composed of Intermediate and Root CA certificates
cat MacRobertIntermediateCA.pem MacRobertRootCA.pem > CA_Chain.pem
- To verify with the certificate chain
openssl verify -CAfile CA_Chain.pem weather.macrobert.home.crt
- PFX File will be required by Asp Net Core based servers
openssl pkcs12 -export -out weather.macrobert.home.pfx -inkey weather.macrobert.home.key -in weather.macrobert.home.crt -certfile CA_Chain.pem- pfx file creation will involve supplying another password used to extract the combined contents of the pfx file.
- Note that verification will require the full preceeding certificate chain composed of Intermediate and Root CA certificates
- Prior to the server certificate installation a DNS entry must be added to a DNS server running locally on the network corresponding to the DNS entry declared in the cnf file above.
Certificate Deployment
- Be sure to add the Root Certificate to the Root CA Certificate Store, and the Intermediate Certificate to the Intermediate CA Store.
- It may be necessary to restart any web browsers to re-read the contents of the store.
Server Certificate Installation on the Kestrel Web Server
- Be sure to add the server address of weather.macrobert.home to the DNS Server. Following this addition web-browsers and dependent systems may also need to be restarted
- Add the pfx file to the project.
-
Add the following JSON entry to
appsettings.jsonadjusting your URL to suit:{ "Kestrel": { "Endpoints": { "Http": { "Url": "http://localhost:8080" }, "Https": { "Url": "https://weather.macrobert.home:8081", "Certificate": { "Path": "weather.macrobert.home.pfx", "Password": "<pfx-password>" } } } } } - Rather than supplying the pfx password to appsettings.json (and erroneously committing it to a source repo) the password can be supplied as an environment variable using a naming convention that maps to the Password configuration in the Kestrel block above.
- An environment Variable with setting “Kestrel__Endpoints__Https__Certificate__Password=bogusPassword” - substitute the bogusPassword with your own.
- Run the
Weather Server. With Chrowme browser navigate tohttps://weather.macrobert.home:8081/swagger/index.htmland examine the certicate for the site.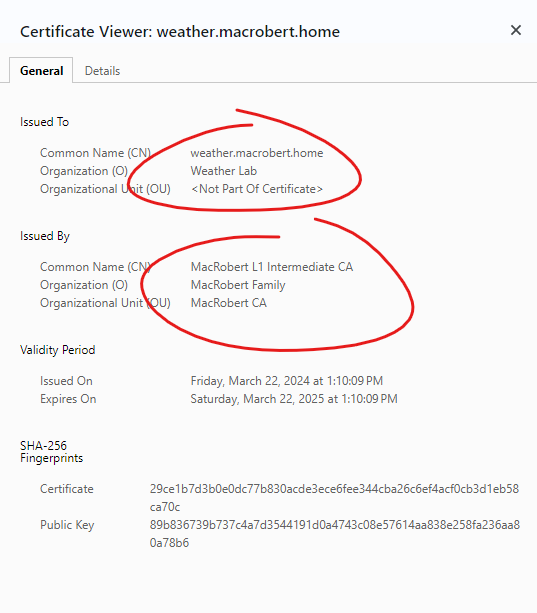
- Server Certificate
weather.macrobert.homeis authenticated via the Intermediate CA 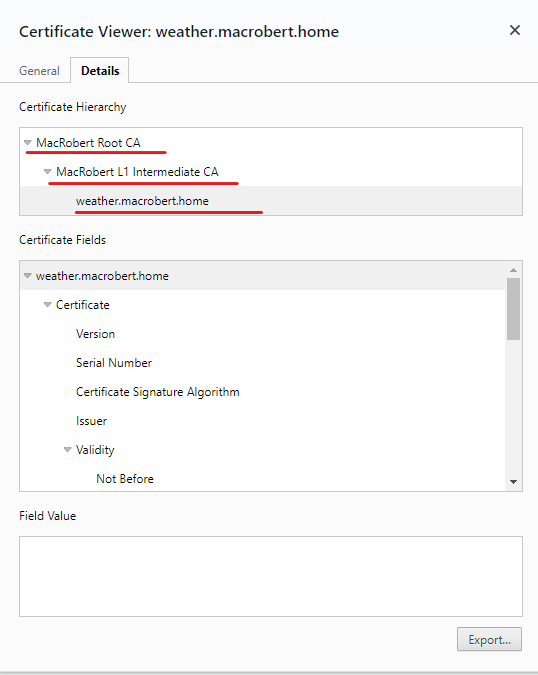
-
- Server Certificate
weather.macrobert.homeis authenticated via a chain of certificates to the CA Root
- Server Certificate